Thursday, February 24, 2011

Figurative Art - Evelyn Markasky

Art is usually divided into 3 categories: figurative, representational (which describes the signs that stand in for and take the place of something else), and abstract. Today we will be looking at figurative work (why do I sound like Mr. Wizard? The weekly 30 minute show from the 50's/60's where Don Herbert played a science hobbyist, and every Saturday morning a neighbor boy (Jimmy) or girl would come to visit. Mister Wizard always had some kind of laboratory experiment going that taught something about science.)
From Wikipedia: 
Figurative artis often taken to mean art which represents the human figure, or even an animal figure, and, though this is often the case, it is not necessarily so: Since the arrival of abstract art the term figurative has been used to refer to any form of modern art that retains strong references to the real world.


Well, hmmm, the real world, whatever that means and how you want to interpret it! Also, the lines in these categories are thin and there is often a crossover. There are a few things I've seen that clearly are figurative:


The first person that comes to mind is Lesley Tinnaro and her study of the forms of the body. She has completely taken the forms of body parts that may not exactly be pretty, and made then into beautiful sculptures. She also crosses over into representational work (which I'm sure happens a lot ) creating a symbol, in this case, of the eye.


TADA 365 22 worn
http://www.flickr.com/photos/lesleytinnaro/
TADA 365 15


The next person that comes to mind is Lorena Angulo, whose work is clearly figurative and clearly representational. She has created figures that obviously represent people, but also symbolizes different actions in our lives. She has created quite an amazing little family!


Virgen and Angel
http://www.flickr.com/photos/lorenaangulo/


Next in line would have to be Kest Schwartzman who has moved from the human figure to the animal figure that is worn as a mask and transforms the human wearing it!
nap
http://www.flickr.com/photos/vagabondjewelry/
family portrait finished      triceratops worn profile   


How do you see your work? Does it naturally fit into one of these categories? How do you think about what you want it to represent?

Friday, February 18, 2011

Where Are You At?

48 DAYS IN.

Are you where you thought you were going? What have you learned? Has your direction changed?

I think the most startling thing that I've learned producing work to post in TADA, is that if I want to get better, if I want to evolve, if I want to learn things, if I want to develop a style... I have to work. Every day. For more than 5 minutes. For at least 4-6 hours. I can't just think I want to create a body of work. I have to actually do it. And it doesn't matter if what I'm working on is 'the one'... 'the masterpiece'... 'the best idea I've ever had'...  It just matters that you are working. You can't just sit around waiting for that one great idea. Things evolve and develop when you can spend some time working on them. You make mistakes which help you to evolve and look at them and at first think 'damn' and then 'hmmmm that looks interesting, maybe I'll try that again, only this time, I'll ...'

Leave a comment and tell us where you're at and post your 1st TADA and your last one so far. No judgement, no criticism, just a way to gauge where you've gone.

notes 1-11
 January 1, 2011


TADA #47/365 2/16/11
February 16, 2011

For me, my first post makes absolutely no sense! I sort of remember writing it, but I don't remember why. It seems  like about 10 different directions. My last post is several experimental pieces trying different techniques with folding and forging and enameling. Samples for techniques I want to use on pieces I'm working with. I rarely did sample pieces before. I always just wanted to get down to the piece. It was kind of like the experiment. But now I'm having fun trying out different things and seeing what the metal and the enamels can do. 

Sunday, February 13, 2011

A few notes on jewelry photography


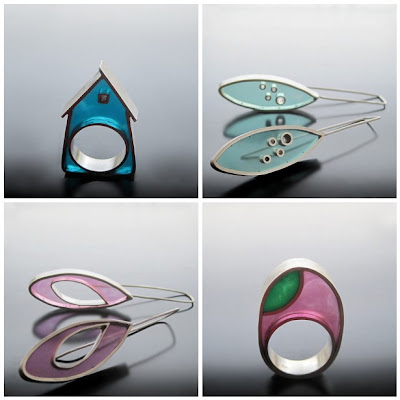
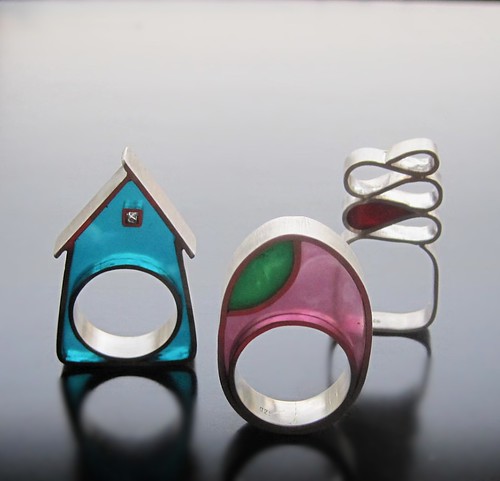
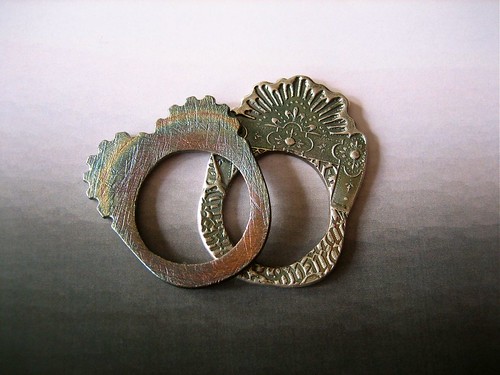
1. TADA365 #38e Home Sweet Home, 2. TADA365 #38d Marquise earrings, 3. TADA365 #38c Marquise earrings, 4. TADA365 #38a Oval Ring

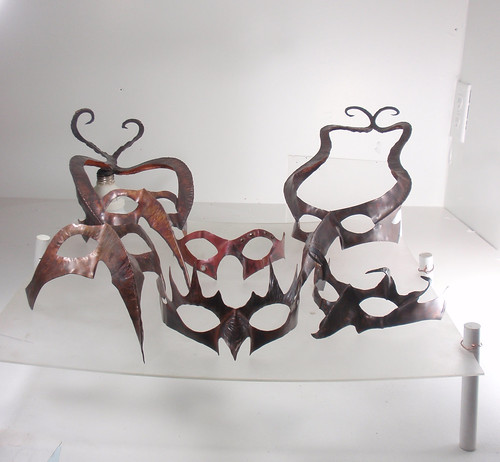
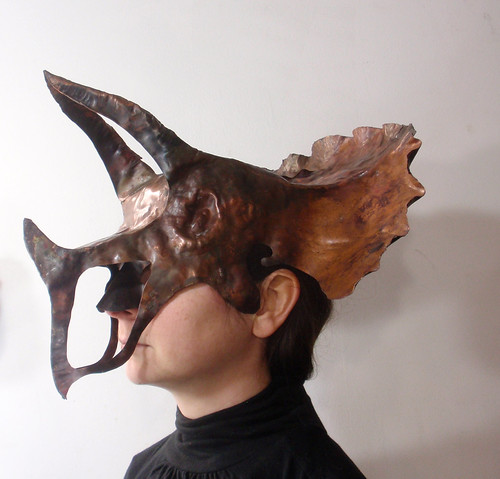
Today, I thought I'd share a few things that worked for me over the years and hope that will help you as well. The images above are pieces of my recent collection, photographed under the conditions that I will briefly describe in this post.

I should start by telling you that I don't have any fancy equipment, camera, lights etc. I use a simple point-and-shoot Canon Digital IXUS 95 IS, which must have cost me about 120€, and that’s last year’s price. My previous one was similar but my little nephew thought it was a nice toy for him.....the rest is history!

I have also bought a lightbox from e-bay for about $10-15 but it never actually worked for me. I believe the reason was that my light sources were inadequate.

What do I do?

First, I always shoot my finished pieces outside in daylight. I just shoot them at my balcony when the light is correct. You need to experiment to understand the light.

By trial and error, I have found that I should never shoot under direct sunlight because the images are overexposed and the colors look as if they are burnt.

Early in the morning you get too much yellow, at noon it's too blue! An overcast day is perfect because it means I can shoot whenever I want, but here in Greece we get a lot of sunlight during most of the day. So I have to be patient and wait until late afternoon to get it right.

As expected, shooting outside imposes certain limitations, waiting for the best light being by far the most significant. Then there are days when it's cold outside or the wind makes it impossible for the pieces to stay still.

Another thing you need to experiment with is the background. You could use paper, plastic, cardstock or even wood.
As I mentioned before, I just use a black plastic IKEA side table. I prefer it because I don't get a lot of reflections and the color of it appears as if gradient grey, when the light is appropriate.

Though it has helped me a lot, after using it for quite a while, the surface is now scratched. I will either replace it or find a new background.

When I'm ready to shoot, I take lots of pictures from many different angles. The camera is set in marco mode and I focus on the object, not the background. The image has to be sharp and crisp. I should say that I use a tripod to control this, but the truth is... I don't!

The next step is to select the best photos and edit them. You don't need an expensive software to do this but if you have Photoshop, that would certainly be nice. Another option is Picnic, which is a free online photo-editing tool.

I'm on a Mac and the software I use is Aperture, which let's me organize and also edit my pictures. I should write about photo editing next time.

So my conclusion is that the key is to experiment in order to find what works best for you. Any additional knowledge regarding photography and your camera settings is helpful but my point is that you neither need to be an expert nor spend a fortune on equipment to achieve acceptable quality photos.

My advice is, whenever you need something extra special, hire a professional. I recently had such an experience, which was very enlightening and made me realize the difference between diy and professional photoshooting.….But that's another story and maybe another blog post!

I would love to hear your thoughts on this subject!

Thank you for reading!

Friday, February 11, 2011

Elements of Design


What things draw our eyes and brains to it? What do we find beautiful? Is it universal? Is it something in miniature. Is it something familiar that we connect to? Something that makes us smile? Is it the shape and form? How do we get there in our own work? These really aren't meant to be rhetorical questions... Leave a comment on how you would answer these questions. How you start thinking about beginning a piece, what process you go through. How much crap you have to make before you get something you like...

For the last several years my process has been to go in and work with the metal. I had a hard time drawing in 2-d something I was making in 3-d. My 3-d pieces never seemed to look like my sketches. A drawing doesn't give you the feeling of bending or folding or torching something. But lately, I feel that those years were used to get the feeling into my fingertips of what the metal could do, to gather all the information. Now I feel like I want to put all that information together into a well thought out piece and a well thought out piece, for me, takes research, thinking, studying other work, drawing, thinking... I still may have to experiment to see what the metal can do, but I need to have a plan.

Here are a few Ring A Week examples of what I think use good, well-thought-out design elements:


Victoria Takahashi (experimetal)

http://www.flickr.com/photos/experimetal/5402761051/in/photostream/

RAW 52-6: Whip It!Shae and Aubrey
http://www.flickr.com/photos/citizenobjects/with/5434224239/

RAW52 #2b, #3b, #4bMaria Apostolou
http://www.flickr.com/photos/maria_apostolou/with/5424766653/

stacking rings RAW 3/52Catherine Witherell
http://www.flickr.com/photos/happydayart/with/5364908813/

I got the following information out of what looks like a high school textbook called 'Exploring Metalwork, Fundamentals of Technology' (John R. Walker, The Goodheart-Willcox Company, Co. 1995, pp. 51-57) from the library. Oddly enough the whole book is pretty informative and interesting. The following is from Unit 4.... Designing a Project:

"Elements of Good Design:

  1. Lines. Lines are used to define and give shape to an object.
  2. Shape. The shape of an object may be determined by the way it will be used.
  3. Form. The 3-d shape of the object. It may be round, square, or some other geometric shape.
  4. Proportion. The balance between parts.
  5. Balance. An object has balance when its parts appear to be of equal weight. When the parts on each side of the centerline are alike in shape and size this is called SYMMETRICAL BALANCE. INFORMAL BALANCE presents a design in such a manner that the balance cannot be measured. However, there is a feeling that the design is balanced.
  6. Unity. A design with unity brings the various parts together as a whole. Each part of the object seems to have a relationship to another part. 
  7. Emphasis. This is where the design is given a point of interest. 
  8. Rhythm. Rhythm is achieved by the repetition of lines, curves, forms,colors, and textures within the design. It gives an object a pleasing appearance.
  9. Texture. Texture is the condition of the surface of a material. Texture can be added by cutting, pressing, perforating, rolling, or expanding.
  10. Color. All metals have a color of their own Colors may also be added using chemicals, paints, lacquers, or other finishing materials. Selection of color is important.
Solving a design problem
  1. State the problem
  2. Think through the problem
  3. Develop your ideas
  4. Prepare working drawings.
  5. Construct the project.
It takes time to acquire the skill to develop well-designed projects.YOU LEARN BY DOING. Keep a notebook of your ideas. Include photos of the projects you have designed and constructed. By reviewing your notebook it will be easy to see how your design skills improve."

Not bad for a textbook!

Friday, February 4, 2011

Convergence

From Dictionary.com 

con·verge

  
[kuhn-vurj]  Show IPA
verb, -verged, -verg·ing.
–verb (used without object)
1.
to tend to meet in a point or line; incline toward each other,as lines that are not parallel
2.
to tend to a common result, conclusion, etc.
3.
Mathematics .
a.
(of a sequence) to have values eventually arbitrarilyclose to some number; to have a finite limit.
b.
(of an infinite series) to have a finite sum; to have asequence of partial sums that converges.
c.
(of an improper integral) to have a finite value.

I always want to do everything there possibly is to do. Every craft, every technique, every option. I like to experiment. I like to jump from one experiment to another. That's ok, but just experimenting means you never have to finish anything or take the time to have a well-done completed piece. It means I can explain away those rough edges because it's just an experiment, it's not the 'real' piece. But I never usually get to the real piece because I'm usually jumping to the next experiment.

One of my goals for doing TADA was to stop the jumping. To take the time to make a piece and then make a better one and then a better one... it becomes a study, which leads to a series, which leads to some satisfaction. 

I want to take all the techniques and things I've learned and instead of making 20 separate things, I want to combine them, I want them to converge, to incline toward each other, to have a finite value.

This is the first stop along the way. Two forged folded shapes welded onto one of those bands I made before with all the holes, heat patina on the inside of the folds and color pencils on the outside. I've already started working on the next one. I have lots of thoughts on how I want to refine it and where I want it to go. It's starting to feel good.

Do you have a story of convergence with your art? If you do please add it to the comments. I would love to hear how other people are thinking about this.